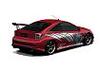
Step one: Find a cool picture. Well whatdaya know, there are some phat pictures right here on EverythingCelica! Kulod!
Step one (After you pick a picture, just pick a freakin picture! It's not that hard!!): Use the polygonal lasso tool to select the entire car! EXCLUDING THINGS SUCH AS SIDE MARKERS AND...other things that aren't supposted to be "color-changed-ded"
Knowing the path and choosing the path are two different things.
Step 6: Use the "Blending properties" for the blue layer. ("Color" usually works best for this) And make it look like it was fresh out of the paint booth.
Knowing the path and choosing the path are two different things.
There ya have it. This process usually works well on cars that have color (anything other then black white and grey.) Now I know some of you are thinking, why the hell did he have us duplicate the car the first time around!?!?! That guys a Jerk!!!! The reason you should duplicate the car is so if you need to mess around with the lighting, you can just bring up brightness/contrast/curves/ w/e and change the lighting of the car w/o changing the lighting of the entire scene.
Knowing the path and choosing the path are two different things.
When it comes to black and white cars, you can use the same process, however, you WILL need to mess around with the brightness and whatnot to make the color look right. ALSO, you will need to select a different "Blending property". Such as multiply, or overlay, depending on the lighting/color and whatnot of the original picture. If you have any questions regarding P/S or...anything, for that matter, feel free to drop me a PM!!!
Knowing the path and choosing the path are two different things.
It's all good. Mac is better for Video Editing and Graphic design. And that's what's fun. Know what it doesnt do? PLAY VIDEO GAMES!!! Very few games avaliable for Macintosh, such as Half life.
Knowing the path and choosing the path are two different things.
um also...when you went to fill it in with color before you used the color properties...did the paint bucket do it in sections...or did it fill in the whole car in one single click...because i had to do mine piece by piece till it filled in all of the car...
how do i use the polygon lasso tool to select the other parts that i don't want to color-change (headlights/sidemarkets etc)?
after i select the body of the car, and try to select the headlights/sidemarkers etc, the selective highlight for the body of the car goes away when i try to select the headlights etc
wtf? so how do i select the entire car AND the headlights/windshield/sidemarkers etc all at the same time???
and also, when i use the paint bucket, i have to press a million times to get the car one color, how do you do it eyger? be more specific please
and..you said the car needs to be on its own layer? how do i go about doing this when i use the polygon tool?
Last edited by element_celica; Jun 13, 2004 1:54pm.
1. when you have the paintbucket in use...play with the tolerance and the other buttons at the top until it fills more at a time...
2. he means make the car its own layer by...after the car is outlined with the polygonal lasso...press "ctrl c" to copy...and right after without doing anything else...press ctrl v to paste a copy of the cr right on top of the existing original one...
also you said something about the lasso not letting you outline other things such as the windshield and the headlights...etc...well...i just go near the bottom right and select "layers" and and chose "color" to allow everything from the original layer to show through except the parts you colored...good luck...hope this helps
yeah i think it would be a lot easier of i could select multi parts of the car at the same time like you guys. when one thing is selected if i try to start another that one goes away... do i need to change something in the settings?
how do you make the laso tool so eksakt i made one before i readed this post with just trying differnt fhings i did only make 2 layer but it worked a little any way since the orginal car was silver but as you see the back window is mesed up and stuff and i dont get the laso to be presise i zoomed in mutch and then i got it a little better but is it any other tips?
its not really about being exact... try using anti-alias feature on the laso tool or try feathering the selection like around 1-3 pixels but not to much, this will compensate for the not so exact selection. good luck
its not really about being exact... try using anti-alias feature on the laso tool or try feathering the selection like around 1-3 pixels but not to much, this will compensate for the not so exact selection. good luck
its not really about being exact... try using anti-alias feature on the laso tool or try feathering the selection like around 1-3 pixels but not to much, this will compensate for the not so exact selection. good luck
My internets fugded up tonite, so I cant see the images. When you change the color of the car, are you desaturating it, then using a brush/fill...and setting it to 'overlay' instead of 'Normal'?
Finally your pics showing up...that looks really good man. What do you mean more 'deep' though?
tnx i with deep i mean if you compare the trees in back ground to the coulor of the car they are more dark in the coulor then the paint.
ehh...ya that does suck, i'm really not sure how to get rid of that...you could perhaps select the reflections in the cars paint with the lasso tool, then click Image> Adjustment> Brightness/Contrast and mess around with the brightness to 'lighten' the reflection a bit...
its not really about being exact... try using anti-alias feature on the laso tool or try feathering the selection like around 1-3 pixels but not to much, this will compensate for the not so exact selection. good luck
wath is and how do i juse anti alias??
when you have the laso tool make sure to have the anti-aliased box checked on the top menu this makes the selection on what your workin on smoother, helps with the edges
way are you good at PS you work with it? or just for fun
why would you want to change the color. the car is given a certain color because thats the color its supposed to be. not saying that getting it painted is stupid, but saying that changing its color in a picture is. that would be like taking a picture of a white guy and changing him to black.
why would you want to change the color. the car is given a certain color because thats the color its supposed to be. not saying that getting it painted is stupid, but saying that changing its color in a picture is. that would be like taking a picture of a white guy and changing him to black.
i think most people do it because they wanna get a preview of what their car would look like if they painted it that way.. duh you had to be a noob
Hey Eyger, what version did you use? CS? Also, for those who are stuck I could provide more steps to make it simpler, photoshop isn't just for pros, it took me just a while to master it.
P.S. Eyger, Do you actually work with photoshop or just as a pastime?
CelicaHobby.com is an independent Toyota Celica enthusiast website. CelicaHobby.com is not sponsored by or affiliated with Toyota Motor Sales, USA, Inc. in any way. The Toyota and Celica names and logos are trademarks owned by Toyota Motor Sales, USA, Inc.


![[Linked Image from i2.photobucket.com]](http://i2.photobucket.com/albums/y10/Celica_GTS/newwwwsig2.jpg)
