|
|
Joined: May 2002
Posts: 5,979 Likes: 9
ECelica Admin 2001 Toyota Celica GT
|
|
ECelica Admin
2001 Toyota Celica GT
Joined: May 2002
Posts: 5,979 Likes: 9 |
Okay, folks, I've solved our perplexing problem regarding the disassembly of the headlight casing so you can get the inside painted to match your car - or tint the inside of the lights to make them "legal" Here's how: 1) Get the parents out of the house as you don't want them to know what you are putting in the oven. 2) Remove the headlight casing from your car (I don't have specific instructions - sorry - but it should be easy to do). Be sure to remove the bulb! 3) Preheat your oven to 250 degrees after placing tin foil on the bottom rack (the rack should be located at the very bottom slot). 4) Remove any nuts, bolts, and screws from the border of the casing. 5) Place your headlight casing inside the oven and set the timer for 10 minutes. 6) After the timer goes off, remove the casing using garden gloves (it'll be a little warm) 7) Take a flat tipped screwdriver and pry up the little plastic "clips", sliding your screwdriver beyond that clip into the joint between the casing and the lens. The adhesive will be very soft and pliable. 8) Pry and slide your screwdriver a little bit down, continue until you see it starting to come apart. 9) Then, increase your angle of prying to drive the two pieces apart. 10) When you see enough to get your fingers in the opening, use your hands to separate the pieces. You may hear a "pop". That may be the yellow reflector coming off, or it could be a tab that wasn't opened. Nevertheless, the pieces won't be damaged. After the lens cools down, you might want to take the opportunity to clean and polish the inside. 11) IF YOU ENCOUNTER ANY STRONG RESISTANCE, check to see that there aren't any nuts or bolts still connected. 12) To get the reflector out of the black plastic base, pry off the plastic cylindrical cover for the headlight adjustment screw. Loosen both nuts to take off the reflector. To reassemble: 1) Do everything backward, including the oven part - you need to get that adhesive pliable again. Make sure you ask your body shop if 250 degrees will harm the paint (I doubt it). YOU CAN PUT THE TWO PIECES TOGETHER AS BEST YOU CAN AND THEN MERGE THEM TOGETHER AFTER THEY COME OUT. 2) I would seriously consider using clear adhesive like Liquid Nails Clear Seal to make sure you have an airtight seal all around. 3) Reinstall, and be sure to re-aim your headlights. [EDIT] Use Tester's Brand "SMOKE"/"WINDOW TINT" Spray Paint - found at most hobby shops for around $4 ![[Linked Image from testors.com]](http://www.testors.com/images/products/SmallImages/1813.jpg) Transparent Black ( WINDOW TINT) http://www.testors.com/Product.asp?product%5fid=1634 ![[Linked Image from testors.com]](http://www.testors.com/images/products/SmallImages/1605.jpg) Transparent Candy Apple ( RED) - also used for red-out tails http://www.testors.com/Product.asp?product%5fid=1605 ![[Linked Image from testors.com]](http://www.testors.com/images/products/SmallImages/1607.jpg) Transparent Hot Rod Red ( DARKER SHADE OF RED) http://www.testors.com/Product.asp?product%5fid=1607 ![[Linked Image from testors.com]](http://www.testors.com/images/products/SmallImages/1601.jpg) Transparent Candy Lime ( GREEN) http://www.testors.com/Product.asp?product%5fid=1601 ![[Linked Image from testors.com]](http://www.testors.com/images/products/SmallImages/1257.jpg) Transparent Blueberry ( BLUE) http://www.testors.com/Product.asp?product%5fid=1257 ![[Linked Image from testors.com]](http://www.testors.com/images/products/SmallImages/1617.jpg) Transparent Candy Grape ( PURPLE) http://www.testors.com/Product.asp?product%5fid=1617ALL OF THE SPRAY COLORS...http://www.testors.com/Products.asp?act_...8&First.y=4 [ testors.com] ... If you want to paint some areas and not the other, use masking tape over that area, then CAREFULLY use a razor blade to cut a circle outline and peel off the edges (leaving the masking tape circle over the space where you do NOT want paint to be sprayed) The difficulty on this painting task is probably an 8 (out of 10. 10 being most difficult). If you take your time and think about what you need to do next, that comes dropped down to a 4.
|
|
|
|
|
Joined: May 2002
Posts: 224
Member
|
|
Member
Joined: May 2002
Posts: 224 |
sweet...thanks for the directions isaac...did you do this to your car? any pics?
|
|
|
|
|
|
Anonymous
Unregistered
|
|
Anonymous
Unregistered
|
i wanna do that but i dont want to take my headlight covers =(
|
|
|
|
|
|
Anonymous
Unregistered
|
|
Anonymous
Unregistered
|
m-spec lights?...HA! now we got are own custom lights for less than $3000 great post isaac
|
|
|
|
|
Joined: May 2002
Posts: 224
Member
|
|
Member
Joined: May 2002
Posts: 224 |
Isaac, I don't think it's possible to use primer when applying the transparent colors, because then it wouldn't be very transparent would it? Unless there is clear primer? Otherwise, using primer would be good if you were going for a solid color. So for those who would like to do transparent colors, will the paint stick enough?
|
|
|
|
|
Joined: May 2002
Posts: 5,979 Likes: 9
ECelica Admin 2001 Toyota Celica GT
|
|
ECelica Admin
2001 Toyota Celica GT
Joined: May 2002
Posts: 5,979 Likes: 9 |
huh? did I say primer anyplace??? 
![[Linked Image]](https://celicahobby.com/sig/id242u.jpg) It's not just your imagination... Your day really does go by twice as fast while on EverythingCelica.com
|
|
|
|
|
Joined: Jun 2002
Posts: 5
New Member
|
|
New Member
Joined: Jun 2002
Posts: 5 |
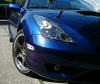
I just got done doing mine!  I picked a color matched automotive paint. HUGE pain in the pee-pee to do this, but well worth it. I think it looks smooth. Too bad I've got some sparkles in the clear parts though. But overall, a very worthwhile and rewarding mod! 
-Mike
|
|
|
|
|
Joined: May 2002
Posts: 224
Member
|
|
Member
Joined: May 2002
Posts: 224 |
Isaac, no you didn't mention using primer. I was just wondering if the paint will stick onto the plastic w/o using primer or not? And how well it'll stick to it and such.
|
|
|
|
|
Joined: May 2002
Posts: 5,979 Likes: 9
ECelica Admin 2001 Toyota Celica GT
|
|
ECelica Admin
2001 Toyota Celica GT
Joined: May 2002
Posts: 5,979 Likes: 9 |
Originally posted by Eugic92:
Isaac, no you didn't mention using primer. I was just wondering if the paint will stick onto the plastic w/o using primer or not? And how well it'll stick to it and such. it's tester's brand paint... it was MADE for plastics 
It's not just your imagination... Your day really does go by twice as fast while on EverythingCelica.com
|
|
|
|
|
Joined: Jun 2002
Posts: 10
Member
|
|
Member
Joined: Jun 2002
Posts: 10 |
Gosh this forum is great! GT2000Quebec, did you use the same type of procedure to paint your lights? Your's look really nice. I'm jealous. I really want to try doing this myself, but I'm a little aprehensive. How long did it take you?
|
|
|
|
|
|
Anonymous
Unregistered
|
|
Anonymous
Unregistered
|
i didn't followed it,... but i did the same thing, you ca nuse it, it's great!!!!
it it take around 3/4 1 hour to open the light... paint it, wait for them to be dry... seal back the light put them on back and it's done... it takes a couples of hours...
|
|
|
|
|
|
Anonymous
Unregistered
|
|
Anonymous
Unregistered
|
wow it looks really good quebec i think its worth a few hours. Im paranoid that i'll mess something up haha
|
|
|
|
|
|
Anonymous
Unregistered
|
|
Anonymous
Unregistered
|
|
|
|
|
|
Joined: Sep 2002
Posts: 7
New Member
|
|
New Member
Joined: Sep 2002
Posts: 7 |
One question, can anyone post anything on how to remove the headlight assembly, I have been unable to find how to get to the 3rd bolt (I assume) that is on the bottom side of the assembly.
Sirrous
|
|
|
|
|
Joined: May 2002
Posts: 5,979 Likes: 9
ECelica Admin 2001 Toyota Celica GT
|
|
ECelica Admin
2001 Toyota Celica GT
Joined: May 2002
Posts: 5,979 Likes: 9 |
It's not just your imagination... Your day really does go by twice as fast while on EverythingCelica.com
|
|
|
|
|
Joined: Sep 2002
Posts: 7
New Member
|
|
New Member
Joined: Sep 2002
Posts: 7 |
Thanks Isaac, Was having trouble with the retainer, will look into it after work
Sirrous
|
|
|
|
|
Joined: Sep 2002
Posts: 26
Member
|
|
Member
Joined: Sep 2002
Posts: 26 |
This is a very weird question that I never thought I would be asking. When cookin the headlights, do you bake, broil, etc. Now how weird does that sound.
|
|
|
|
|
Joined: Sep 2002
Posts: 26
Member
|
|
Member
Joined: Sep 2002
Posts: 26 |
Hey guys.. I attempted this feat, got about what I think was 1/2 way through with them and can not go any further... between the fact that I have no idea what I am doing, and the overall pain in the butt of this. I was wondering if anyone would be interested in making a few extra bucks and do this for me. Only condition tothis is that I want to see pics of the ones you have done. I will supply paint and lights (of course) and will overnight them to your place. Anyone interested name a price and we can take it from there. Thank you.
|
|
|
|
|
Joined: Feb 2003
Posts: 2
New Member
|
|
New Member
Joined: Feb 2003
Posts: 2 |
hey gt2000quebec i really dig the car .. well i am hoping i can do this to my car .. it make take me a while but hey thanks for the help isacc for giving me nice info..
|
|
|
|
|
|
Anonymous
Unregistered
|
|
Anonymous
Unregistered
|
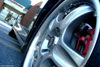
Does anyone know how much it will affect the brightness of the headlight if I paint the reflector too? I have seen it done, but I dont know how much it affects the light.
|
|
|
|
|
Joined: Nov 2003
Posts: 453
Senior Member 2000 Toyota Celica
|
|
Senior Member
2000 Toyota Celica
Joined: Nov 2003
Posts: 453 |
Hey just did the mod, I suggestion though. Forget the oven I almost torched my casings putting them in there. Use a standard 1000 degree heat gun. It might take a lil longer since you have to go around and heat the whole casing but its worth it and after your done painting get some silicone silicone sealent or something to fill up the gaps after you re-heated the epoxy and joined the 2 peaces back together. **warning** The heat gun heats things FAST! if pointed to one spot...I have an annoying blister to prove it...good luck
The 2ZZ god
|
|
|
|
|
|
Anonymous
Unregistered
|
|
Anonymous
Unregistered
|
i did mines and the plastic turned yellow a bit. is there any way to get it off?
|
|
|
|
|
Joined: Aug 2004
Posts: 1,546
Specialist 2000 Toyota Celica
|
|
Specialist
2000 Toyota Celica
Joined: Aug 2004
Posts: 1,546 |
Just did mine today. I strongly receommend 300 degrees for 15 minutes exactly...comes off really easy...just make sure you take everything off your headlight first. Came out beautifully!
|
|
|
- Part Reviews
- OEM Parts Catalog
- Body Kits, Ground Effects
- Hoods, Hood Scoops
- Spoilers, Wings, Splitters
- Side Mirrors
- Head/Tail Lights & Bulbs
- Interior Appearance
- Interior Performance
- Engine Dress-up Kits
- Exhaust Systems
- Engine Performance
- Bars, Braces, Coilovers
- Shocks, Springs
- Wheels, Tires, Brakes
- Audio, Video, Security
|
|
|
|


![[Linked Image from imagestation.com]](http://www.imagestation.com/picture/sraid25/p045a6f552828fbb1f57ae36dbe03b9f9/fd90ba8a.jpg)
![[Linked Image from imagestation.com]](http://www.imagestation.com/picture/sraid25/p7734a93c2b3dca1879fae20b173daeab/fd90b9fb.jpg)
![[Linked Image from imagestation.com]](http://www.imagestation.com/picture/sraid25/pbadd8318c8591c9ae4c74143e829b604/fd90ba36.jpg)
![[Linked Image]](https://celicahobby.com/gal3/albums/temp_isaac/headlightassembly.gif)
![[Linked Image]](https://celicahobby.com/forums/attach/1869928836-Evan2.jpg)