|
|
Joined: Oct 2003
Posts: 3,037
Specialist 2000 Toyota Celica
|
|
Specialist
2000 Toyota Celica
Joined: Oct 2003
Posts: 3,037 |
Celica GTS DC Sport Header Install Guide
I finally finish installing my header yesterday it took me 2 days so if you dont have mechanical experience just take it to a shop.
I'm not responsible if anything goes wrong do this at your own will
Tools you will need to finish this installation
- set of socket wrenches from 10 mm to 14mm
- set of wrenches from 10mm to 14mm
- an adjustable wrench (for the sensor on the exhaust)
- extension for socket wrench 20
- pipes, long pipes -- not too long, just fat enough to fit the wrench handle. this will be used for more leverage. it makes the installation much easier
|
|
|
|
|
Joined: Oct 2003
Posts: 3,037
Specialist 2000 Toyota Celica
|
|
Specialist
2000 Toyota Celica
Joined: Oct 2003
Posts: 3,037 |
Step one
First you need to disconnect your negative battery terminal (10 mm)
(Note: you should just remove the whole battery, its going to have to come out later on)
|
|
|
|
|
Joined: Oct 2003
Posts: 3,037
Specialist 2000 Toyota Celica
|
|
Specialist
2000 Toyota Celica
Joined: Oct 2003
Posts: 3,037 |
Step two
Under the car you need to remove your dirt guard, to make it easier to reach jack up the car but dont lift it off the ground, you dont need to do this till later, just enough to give you room to get under and take out all the bots and nuts and shit, ill point were they are in the picture below
|
|
|
|
|
Joined: Oct 2003
Posts: 3,037
Specialist 2000 Toyota Celica
|
|
Specialist
2000 Toyota Celica
Joined: Oct 2003
Posts: 3,037 |
Picture two
on each side of the car were your wheel is located take out the 3 screws or what ever they are out of the way, ill point them out do this on both sides
|
|
|
|
|
Joined: Oct 2003
Posts: 3,037
Specialist 2000 Toyota Celica
|
|
Specialist
2000 Toyota Celica
Joined: Oct 2003
Posts: 3,037 |
Step Three
First disconnect the 4 ignition coil harnesses pointed in the picture
Last edited by Clos; Aug 1, 2004 7:58pm.
|
|
|
|
|
Joined: Oct 2003
Posts: 3,037
Specialist 2000 Toyota Celica
|
|
Specialist
2000 Toyota Celica
Joined: Oct 2003
Posts: 3,037 |
Then remove the 4 ignition coil bolts on top of the valve cover (10 mm)
|
|
|
|
|
Joined: Oct 2003
Posts: 3,037
Specialist 2000 Toyota Celica
|
|
Specialist
2000 Toyota Celica
Joined: Oct 2003
Posts: 3,037 |
Now remove the bolts and the 2 harnesses shown in the picture below
|
|
|
|
|
Joined: Oct 2003
Posts: 3,037
Specialist 2000 Toyota Celica
|
|
Specialist
2000 Toyota Celica
Joined: Oct 2003
Posts: 3,037 |
Step Four
Its time to take out the valve cover but first we need to get this two nuts (10 mm)
|
|
|
|
|
Joined: Oct 2003
Posts: 3,037
Specialist 2000 Toyota Celica
|
|
Specialist
2000 Toyota Celica
Joined: Oct 2003
Posts: 3,037 |
Next remove all 9 screws from the engine cover
|
|
|
|
|
Joined: Oct 2003
Posts: 3,037
Specialist 2000 Toyota Celica
|
|
Specialist
2000 Toyota Celica
Joined: Oct 2003
Posts: 3,037 |
|
|
|
|
|
Joined: Oct 2003
Posts: 3,037
Specialist 2000 Toyota Celica
|
|
Specialist
2000 Toyota Celica
Joined: Oct 2003
Posts: 3,037 |
|
|
|
|
|
Joined: Oct 2003
Posts: 3,037
Specialist 2000 Toyota Celica
|
|
Specialist
2000 Toyota Celica
Joined: Oct 2003
Posts: 3,037 |
Now your engine should look like this
(note: credit for the last 3 pictures goes to the teamcelica installation guide on the lift bolts)
|
|
|
|
|
Joined: Oct 2003
Posts: 3,037
Specialist 2000 Toyota Celica
|
|
Specialist
2000 Toyota Celica
Joined: Oct 2003
Posts: 3,037 |
also make sure you cover the camshaft and everything around it. i used a clean paper bag and put it on top so no dirt and shit could get on it
|
|
|
|
|
Joined: Oct 2003
Posts: 3,037
Specialist 2000 Toyota Celica
|
|
Specialist
2000 Toyota Celica
Joined: Oct 2003
Posts: 3,037 |
Step Five
Now there are 5 screws on the top heat shield ill post the right hand side of it and then the left side okay
|
|
|
|
|
Joined: Oct 2003
Posts: 3,037
Specialist 2000 Toyota Celica
|
|
Specialist
2000 Toyota Celica
Joined: Oct 2003
Posts: 3,037 |
left side
sorry the harness in on the way but you can find it if you got this far
also i removed the battery to get to this bolts, you should do the same
|
|
|
|
|
Joined: Oct 2003
Posts: 3,037
Specialist 2000 Toyota Celica
|
|
Specialist
2000 Toyota Celica
Joined: Oct 2003
Posts: 3,037 |
to make this easier use the pipes i told you to get put them at the end of the wrench and this should make it a lot easy to break the bolts and save you a lot of strength
(note from now on you should use this method to break every bolt)
|
|
|
|
|
Joined: Oct 2003
Posts: 3,037
Specialist 2000 Toyota Celica
|
|
Specialist
2000 Toyota Celica
Joined: Oct 2003
Posts: 3,037 |
Its time to get under the car
Jack up the car and make sure you put it on jack stands you dont want to die trying to install something.
Now we are trying to get the bottom part of the heat shield off there should be only four on this one the first picture are the ones closes to the engine and the one ones are away from it
|
|
|
|
|
Joined: Oct 2003
Posts: 3,037
Specialist 2000 Toyota Celica
|
|
Specialist
2000 Toyota Celica
Joined: Oct 2003
Posts: 3,037 |
|
|
|
|
|
Joined: Oct 2003
Posts: 3,037
Specialist 2000 Toyota Celica
|
|
Specialist
2000 Toyota Celica
Joined: Oct 2003
Posts: 3,037 |
Note I tried everything I could to get the heat shields out at this point but its kind of impossible so dont try it would be a waste of time
(credit for the last 2 pictures go to the person that made the other installation guide on the header)
Last edited by Clos; Aug 1, 2004 8:10pm.
|
|
|
|
|
Joined: Oct 2003
Posts: 3,037
Specialist 2000 Toyota Celica
|
|
Specialist
2000 Toyota Celica
Joined: Oct 2003
Posts: 3,037 |
Step Six
Remove the bracket that holds the header there are 3 bolts there (14mm)
Make sure you hold it its heavy and might hurt you if it falls on u
|
|
|
|
|
Joined: Oct 2003
Posts: 3,037
Specialist 2000 Toyota Celica
|
|
Specialist
2000 Toyota Celica
Joined: Oct 2003
Posts: 3,037 |
Step seven
Now we are going to take out the exhaust pipe to make this a whole lot easy
First take out the 2 bolts connected to the header there 14mm
|
|
|
|
|
Joined: Oct 2003
Posts: 3,037
Specialist 2000 Toyota Celica
|
|
Specialist
2000 Toyota Celica
Joined: Oct 2003
Posts: 3,037 |
Now go down the end of the pipe and get the other two there also 14mm
|
|
|
|
|
Joined: Oct 2003
Posts: 3,037
Specialist 2000 Toyota Celica
|
|
Specialist
2000 Toyota Celica
Joined: Oct 2003
Posts: 3,037 |
Now disconnect the sensor by using an adjustable wrench
|
|
|
|
|
Joined: Oct 2003
Posts: 3,037
Specialist 2000 Toyota Celica
|
|
Specialist
2000 Toyota Celica
Joined: Oct 2003
Posts: 3,037 |
|
|
|
|
|
Joined: Oct 2003
Posts: 3,037
Specialist 2000 Toyota Celica
|
|
Specialist
2000 Toyota Celica
Joined: Oct 2003
Posts: 3,037 |
And try to do this to get the rubber hooks out of the exhaust
|
|
|
|
|
Joined: Oct 2003
Posts: 3,037
Specialist 2000 Toyota Celica
|
|
Specialist
2000 Toyota Celica
Joined: Oct 2003
Posts: 3,037 |
Now its time to make more room
Remove the heat shield it has 4 nuts there 10 mm
|
|
|
|
|
Joined: Oct 2003
Posts: 3,037
Specialist 2000 Toyota Celica
|
|
Specialist
2000 Toyota Celica
Joined: Oct 2003
Posts: 3,037 |
Now remove the other head shield there are 2 nuts 10mm right under the hood here is a pix now there should be about 2 more nuts under the car get them off before you can remove that heat shield I forgot to take a picture of it sorry but if you got this far you can figure it out
|
|
|
|
|
Joined: Oct 2003
Posts: 3,037
Specialist 2000 Toyota Celica
|
|
Specialist
2000 Toyota Celica
Joined: Oct 2003
Posts: 3,037 |
Now with all of this out you should be able to try to get the head shield out im not saying its going to be easy because even with this it was hard what I did was take the top head shield out of the top of the car and when it was not coming out I started to harmer it and it came out and the bottom one just pull it and move around to get it out
|
|
|
|
|
Joined: Oct 2003
Posts: 3,037
Specialist 2000 Toyota Celica
|
|
Specialist
2000 Toyota Celica
Joined: Oct 2003
Posts: 3,037 |
Now here is the biggest bitch to do, getting the header screws out
There are 5 here is the picture
(Note the only screws you can get from above the car is the one in the middle I took all the other ones from under the car
(picture credit to the other install guide)
|
|
|
|
|
Joined: Oct 2003
Posts: 3,037
Specialist 2000 Toyota Celica
|
|
Specialist
2000 Toyota Celica
Joined: Oct 2003
Posts: 3,037 |
Now on the other installation guide they say to remove some shit that has to deal with the suspension but I dont think he remove his pipe thats y he had to do this.
Now pull the header just the way it is it should come out it took me 15 mins to figure it out. Basically just pull it from under the car grab it by the ass and just pull it dont turn it or anything you should have enough room to get it out.
After you get it off put the new one on just the way you took the stock one out, it should not be hard after that bam youre done.
Here is the after pix from under the car and above it
Last edited by Clos; Aug 1, 2004 8:23pm.
|
|
|
|
|
Joined: Oct 2003
Posts: 3,037
Specialist 2000 Toyota Celica
|
|
Specialist
2000 Toyota Celica
Joined: Oct 2003
Posts: 3,037 |
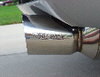
note i had not bolt the exhaust to the header yet so yeah. the fitness is perfect and i can feel a lot of torque and a lot more power wen im in the 7 rpm range, great mod  here is the pix from above
|
|
|
|
|
Joined: Oct 2003
Posts: 3,037
Specialist 2000 Toyota Celica
|
|
Specialist
2000 Toyota Celica
Joined: Oct 2003
Posts: 3,037 |
any questions feel free to ask
and yes i did left the heat shield off. why? i dont know you dont have to leave it off but i just left it off because i was 2 lazy to put it back on, but if you want 2 you can put it back on, it should fit perfect
|
|
|
|
|
|
Anonymous
Unregistered
|
|
Anonymous
Unregistered
|
awesome bro...nice guide...glad to hear all went well...hope your hand heals  and congrats
|
|
|
|
|
Joined: Oct 2003
Posts: 3,037
Specialist 2000 Toyota Celica
|
|
Specialist
2000 Toyota Celica
Joined: Oct 2003
Posts: 3,037 |
yeah its gettin better hahahah to bad my friend got more hurt then i did thanks danny you asshole lets go to the track to see wat we get (beat that asshole enrique and his gay altima)
|
|
|
|
|
Joined: Nov 2002
Posts: 342
Member 2000 Toyota Celica
|
|
Member
2000 Toyota Celica
Joined: Nov 2002
Posts: 342 |
Great install guide, thanks a lot! Now i'll be sure to install em when i get em...
Not just another girl's car...
|
|
|
|
|
Joined: Jan 2004
Posts: 311
Member 2000 Toyota Celica
|
|
Member
2000 Toyota Celica
Joined: Jan 2004
Posts: 311 |
nice guide, i like the yellow hands!
"I didnt realize girls had that much plumbing down there. I saw a diagram of it and it looked like a map for six flags."
|
|
|
|
|
Joined: Oct 2003
Posts: 3,037
Specialist 2000 Toyota Celica
|
|
Specialist
2000 Toyota Celica
Joined: Oct 2003
Posts: 3,037 |
and also make sure ya spray some WD40 on all the bolts. to make it easy
|
|
|
|
|
Joined: May 2003
Posts: 1,296
Specialist 2001 Toyota Celica GT
|
|
Specialist
2001 Toyota Celica GT
Joined: May 2003
Posts: 1,296 |
awsome guide man!
|
|
|
|
|
Joined: Jul 2004
Posts: 31
Member 2004 Acura RSX
|
|
Member
2004 Acura RSX
Joined: Jul 2004
Posts: 31 |
That damn header was a bitch time ten to put in. Oh well, it was worth it.
|
|
|
|
|
Joined: Oct 2003
Posts: 1,154
Specialist 2003 Toyota Celica
|
|
Specialist
2003 Toyota Celica
Joined: Oct 2003
Posts: 1,154 |
|
|
|
|
|
Joined: Feb 2004
Posts: 47
Member 2000 Toyota Celica
|
|
Member
2000 Toyota Celica
Joined: Feb 2004
Posts: 47 |
Great guide! I didn't even think to pull out the battery to get to some of the bolts when I put mine in. They were a little bit of a pain but after it's done you feel great.
|
|
|
|
|
Joined: Jul 2003
Posts: 493
Senior Member 2000 Toyota Celica
|
|
Senior Member
2000 Toyota Celica
Joined: Jul 2003
Posts: 493 |
did you reuse your gasket or buy another one b4 hand??
|
|
|
|
|
Joined: Oct 2003
Posts: 3,037
Specialist 2000 Toyota Celica
|
|
Specialist
2000 Toyota Celica
Joined: Oct 2003
Posts: 3,037 |
nah i just use the same one it was not that worn out so you should be good
|
|
|
|
|
Joined: Aug 2003
Posts: 874
Senior Member 2000 Toyota Celica
|
|
Senior Member
2000 Toyota Celica
Joined: Aug 2003
Posts: 874 |
What is the factory tourque for tightening the bolts? And I do not mean "as hard as you can", or "The tighter the better". There has to be a spec. Thanks.
Last edited by cooltoy2000; Aug 28, 2004 5:28pm.
|
|
|
|
|
Joined: Oct 2003
Posts: 3,037
Specialist 2000 Toyota Celica
|
|
Specialist
2000 Toyota Celica
Joined: Oct 2003
Posts: 3,037 |
it dosent say any were that you have to torque them, and i would say as hard as you can, you want the right torque call dc or ur local toyota dealer, it has to be tight enough so you wont get licks and get that ugly sound
|
|
|
|
|
Joined: Sep 2004
Posts: 895
Senior Member 2004 Toyota Celica
|
|
Senior Member
2004 Toyota Celica
Joined: Sep 2004
Posts: 895 |
|
|
|
|
|
Joined: Oct 2003
Posts: 3,037
Specialist 2000 Toyota Celica
|
|
Specialist
2000 Toyota Celica
Joined: Oct 2003
Posts: 3,037 |
|
|
|
|
|
Joined: Feb 2004
Posts: 1
New Member 2002 Toyota Celica GTS T-Sport
|
|
New Member
2002 Toyota Celica GTS T-Sport
Joined: Feb 2004
Posts: 1 |
help me
i have a european model, i have EGR valve.
help me!!!
|
|
|
|
|
Joined: Oct 2003
Posts: 3,037
Specialist 2000 Toyota Celica
|
|
Specialist
2000 Toyota Celica
Joined: Oct 2003
Posts: 3,037 |
wat year is ur car, i dont know bro i cant help you there, but im seeling my header i need money right now so i dont know
|
|
|
|
|
Joined: Aug 2003
Posts: 371
Member 2003 Toyota Celica
|
|
Member
2003 Toyota Celica
Joined: Aug 2003
Posts: 371 |
help me
i have a european model, i have EGR valve.
help me!!! You can't use the DC header with an EGR valve, it says it right on the box, before you even open it.
|
|
|
- Part Reviews
- OEM Parts Catalog
- Body Kits, Ground Effects
- Hoods, Hood Scoops
- Spoilers, Wings, Splitters
- Side Mirrors
- Head/Tail Lights & Bulbs
- Interior Appearance
- Interior Performance
- Engine Dress-up Kits
- Exhaust Systems
- Engine Performance
- Bars, Braces, Coilovers
- Shocks, Springs
- Wheels, Tires, Brakes
- Audio, Video, Security
|
|
|
|


![[Linked Image]](https://celicahobby.com/sig/Heat2.jpg)
