|
|
Joined: Jul 2002
Posts: 1,285
Specialist 2001 Toyota Celica GT
|
|
Specialist
2001 Toyota Celica GT
Joined: Jul 2002
Posts: 1,285 |
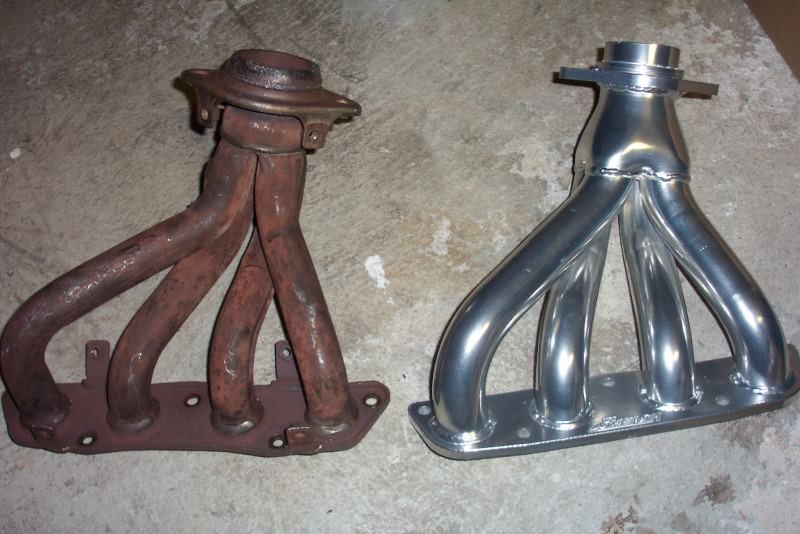
First off, I wanted to thank FastCelicaGT22 & AZZKIKR for answering my questions on the threads I posted in Ecelica and last but not least my boy Raso for physically helping me out with the install. This is the install guide I used and the guide I will be referencing. https://celicahobby.com/ubbthreads/thread.f_1870145513_0_collapsed_2__1.htmlI am not going to explain how to remove the mudguards or where and how to remove the bolts because it's already explained on two different guides in Ecelica. I'm going to concentrate more on the BITCH of the project, which is removing the heat shield and header from the Celica. Here are a few hints that aren't found on the guide that I think should've been mentioned. Installing headers on a GT isn't that different then installing them on a GTS except for a few differences that I noticed along the way. One difference is that on the GT there is no need to remove the valve cover, credit for that goes to FastCelicaGT22, don't know why it's really mentioned on the guide so you could totally skip that section of the install and go directly to Step 5. Second difference is that you will decrease one bolt when following the instruction guide for removing the heat shield & header. For example, if the guide says that you need to remove 5 bolts off the heat shield you will only remove 4 don't ask me "why?" it's just something that we noticed. Maybe, Toyota wanted to be a little cheaper on the GT and decrease a bolt. I personally think this should be mentioned one the top of the install guide before Step 1. The most important thing you must remember about the removal of the heat shield and header is that neither the header nor the heat shield will be removed through the top. No matter how much you think you can remove them through the top, you can't. Even though FastCelicaGT22 & AZZKIKR had warned me about this, I had to be an ass and try anyways. But I learned this the hard way and spent about 1 hour, twisting, turning and pulling. So, don't waste your time because the heat shield and headers are removed through the bottom of the Celica. This step should go right before "Its time to get under the car". Even though the top part of the heat shield is the first to be detached it's not the first to be removed. Like I said before everything must be removed through the bottom so you must make space for it to come out first. 
![[Linked Image]](https://celicahobby.com/forums/attach/1869801852-Stun.jpg)
|
|
|
|
|
Joined: Jul 2002
Posts: 1,285
Specialist 2001 Toyota Celica GT
|
|
Specialist
2001 Toyota Celica GT
Joined: Jul 2002
Posts: 1,285 |
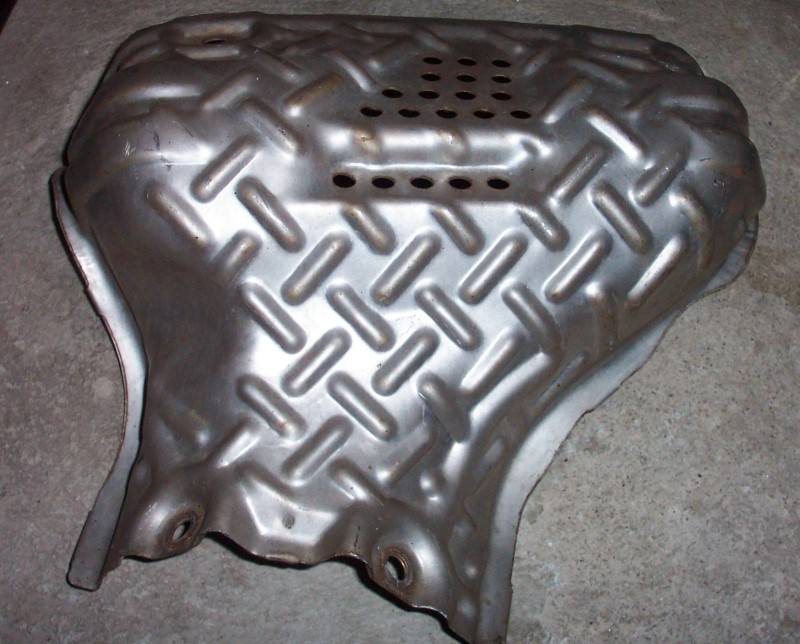
Before Step 6: The second thing to be detached is the bottom part of the heat shield and this will be the first thing to come out and it pretty much could be removed anywhere on the bottom of the Celica cause it's fairly small.
Bottom Part of the heat shield
|
|
|
|
|
Joined: Jul 2002
Posts: 1,285
Specialist 2001 Toyota Celica GT
|
|
Specialist
2001 Toyota Celica GT
Joined: Jul 2002
Posts: 1,285 |
I have provided this picture below for you to compare the size of the top and bottom part of the heat shield.
|
|
|
|
|
Joined: Jul 2002
Posts: 1,285
Specialist 2001 Toyota Celica GT
|
|
Specialist
2001 Toyota Celica GT
Joined: Jul 2002
Posts: 1,285 |
After Step 6: By now, you must've notice that the stock headers has a small piece welded on which is attached to the bracket that you just removed. Well, take a minute and get acquainted with your arch-nemesis because this piece is going to get in the way so many times when you are trying to remove the stock header. This piece is the reason why you can't remove the headers through the top. The Hotshot header doesn't have this piece so you will easily be able to place the NEW headers through the top.
Arch nemesis
|
|
|
|
|
Joined: Jul 2002
Posts: 1,285
Specialist 2001 Toyota Celica GT
|
|
Specialist
2001 Toyota Celica GT
Joined: Jul 2002
Posts: 1,285 |
Before Step 7: These bolts are a pain in the ass. If you have an air gun this would be the time to use it or if you have the strength of The Incredible HULK, then your fine. But for those unfortunate few that don't have an air gun and are skinny/weak, like myself, you are going to need a pipe for leverage but it's also going to take some strength. ![[Linked Image]](https://celicahobby.com/forums/attach/1870145563-DSCN3232.JPG) This step will be after you remove the exhaust pipe and exhaust heat shield (Step 7) or after the header is unbolted. It really depends on how well YOU could maneuver the top part of the heat shield. I was able to maneuver the top part of the heat shield without unbolting the header but it really depends on your ability. The point is basically to get the top part of the heat shield under the header and on the bottom of the Celica, this shouldn't be hard to accomplish. After you get the top part of the heat shield on the bottom of the Celica you will be removing the heat shield by placing it sideways and through this small gap (picture below). From under the car it doesn't look possible because the gap looks a lot smaller than the heat shield but we even put the heat shield back in and tried again. It works but the heat shield must be sideways. Top part of the heat shield 
![[Linked Image]](https://celicahobby.com/forums/attach/1869801852-Stun.jpg)
|
|
|
|
|
Joined: Jul 2002
Posts: 1,285
Specialist 2001 Toyota Celica GT
|
|
Specialist
2001 Toyota Celica GT
Joined: Jul 2002
Posts: 1,285 |
This is the gap where the top part of the heat shield will be removed.
|
|
|
|
|
Joined: Jul 2002
Posts: 1,285
Specialist 2001 Toyota Celica GT
|
|
Specialist
2001 Toyota Celica GT
Joined: Jul 2002
Posts: 1,285 |
This step will go after the header is unbolted. We are now ready to remove the stock header. The headers will come out through this gap (picture below) and the header must be upside-down, credit for that tip goes to FastCelicaGT22. Now, I'm not going to sit here and tell you that it's going to slide right out because it's not. Here is where your arch-nemesis is going to play tricks with your head again. You will need to twist, turn and pull while the header is upside down. It literally took me about 3 minutes so don't get frustrate or lose your cool because it is possible. ![[Linked Image]](https://celicahobby.com/forums/attach/1870145592-DSCN3237.JPG) Last step would be to put the Hotshot headers on and they could go through the top (picture below) because like I said before, they don't have that small welded piece that the stock headers has. Now, sit back and enjoy the NEW sound and performance that this baby gives off. This is where the Hotshot header will be inserted.
|
|
|
|
|
Joined: Jul 2002
Posts: 1,285
Specialist 2001 Toyota Celica GT
|
|
Specialist
2001 Toyota Celica GT
Joined: Jul 2002
Posts: 1,285 |
|
|
|
|
|
Joined: Apr 2004
Posts: 990
Senior Member 2000 Toyota Celica GT
|
|
Senior Member
2000 Toyota Celica GT
Joined: Apr 2004
Posts: 990 |
|
|
|
|
|
Joined: Aug 2003
Posts: 4,265
TheFilipinoCrew 2000 Toyota Celica GT
|
|
TheFilipinoCrew
2000 Toyota Celica GT
Joined: Aug 2003
Posts: 4,265 |
nice!!! yea the headers does give off a nice sound. 
|
|
|
|
|
Joined: Jul 2002
Posts: 10,110
05 WRB 2005 Subaru WRX STi
|
|
05 WRB
2005 Subaru WRX STi
Joined: Jul 2002
Posts: 10,110 |
SUBARU TECNICA INTERNATIONAL
|
|
|
|
|
Joined: Feb 2003
Posts: 916
Senior Member 2003 Toyota Celica GT
|
|
Senior Member
2003 Toyota Celica GT
Joined: Feb 2003
Posts: 916 |
Great info!!! More tips always help!
|
|
|
|
|
Joined: Jan 2004
Posts: 1,612
2low2slow 2002 Toyota Celica GT
|
|
2low2slow
2002 Toyota Celica GT
Joined: Jan 2004
Posts: 1,612 |
hmmmm
idk would they be worth it for a gt?
![[Linked Image]](https://celicahobby.com/forums/attach/1869898045-untouch.jpg) A boats a boat, but the mystery box could be anything....Even a boat!
|
|
|
|
|
Joined: Sep 2004
Posts: 754
Senior Member 2000 Toyota Celica GT
|
|
Senior Member
2000 Toyota Celica GT
Joined: Sep 2004
Posts: 754 |
No problem man, just glad to see you got it on. Have had mine on for some time now and I love every minute of it. Hope you enjoy yours as much as i have mine.
Good job
-Shawn-
"If your not the lead Dog the View never Changes"
|
|
|
|
|
Joined: Apr 2003
Posts: 797
Senior Member 2003 Toyota Celica GT
|
|
Senior Member
2003 Toyota Celica GT
Joined: Apr 2003
Posts: 797 |
Whats the difference like? Noticeable?
|
|
|
|
|
Joined: Jul 2002
Posts: 1,285
Specialist 2001 Toyota Celica GT
|
|
Specialist
2001 Toyota Celica GT
Joined: Jul 2002
Posts: 1,285 |
Sure, Ill post a sound clip tonight.
|
|
|
|
|
Joined: Jul 2002
Posts: 1,285
Specialist 2001 Toyota Celica GT
|
|
Specialist
2001 Toyota Celica GT
Joined: Jul 2002
Posts: 1,285 |
Whats the difference like? Noticeable? The difference is definitely noticeable. The car is a lot louder and it picks up a lot quicker. I would totally recommend this mod.
|
|
|
|
|
Joined: Dec 2003
Posts: 2,670
Specialist 2003 Toyota Celica
|
|
Specialist
2003 Toyota Celica
Joined: Dec 2003
Posts: 2,670 |
wow, GT have so much room to work with... 
|
|
|
|
|
Joined: Oct 2003
Posts: 3,037
Specialist 2000 Toyota Celica
|
|
Specialist
2000 Toyota Celica
Joined: Oct 2003
Posts: 3,037 |
the header should of came out in 10 seconds if you just pull the right way. it fits right in the gap left from the exhaust and heat shields, its funny because i remember taking 2 days to do this and then wen sold the header it took me 30 minutes to do it, just get to know the car and you can get done in half the time.  get a sound clip i wanna remember wat it was like to have headers
|
|
|
|
|
Joined: Apr 2004
Posts: 20
Member 2003 Toyota Celica GT
|
|
Member
2003 Toyota Celica GT
Joined: Apr 2004
Posts: 20 |
so the heat sheild is left off? or do you put it back on?
|
|
|
|
|
Joined: Jan 2004
Posts: 1,612
2low2slow 2002 Toyota Celica GT
|
|
2low2slow
2002 Toyota Celica GT
Joined: Jan 2004
Posts: 1,612 |
sound clip would be awesome.
![[Linked Image]](https://celicahobby.com/forums/attach/1869898045-untouch.jpg) A boats a boat, but the mystery box could be anything....Even a boat!
|
|
|
|
|
Joined: Sep 2004
Posts: 754
Senior Member 2000 Toyota Celica GT
|
|
Senior Member
2000 Toyota Celica GT
Joined: Sep 2004
Posts: 754 |
"If your not the lead Dog the View never Changes"
|
|
|
- Part Reviews
- OEM Parts Catalog
- Body Kits, Ground Effects
- Hoods, Hood Scoops
- Spoilers, Wings, Splitters
- Side Mirrors
- Head/Tail Lights & Bulbs
- Interior Appearance
- Interior Performance
- Engine Dress-up Kits
- Exhaust Systems
- Engine Performance
- Bars, Braces, Coilovers
- Shocks, Springs
- Wheels, Tires, Brakes
- Audio, Video, Security
|
|
|
|